
1. Choose Variance POs from the Budget Detail screen or from the EV2 Main Menu.
2. Choose Add Purchase Order from the link at the bottom of the screen.
To build a VPO from the Job Budget:
1. Choose Variance POs from the link at the bottom of the screen Budget Detail screen.
2. Click on the Add VPO link.

3. Enter the Variance Purchase Order Detail information by following the steps below.
|
Note |
|
Budget is only available for selection from the Main Menu link. |
|
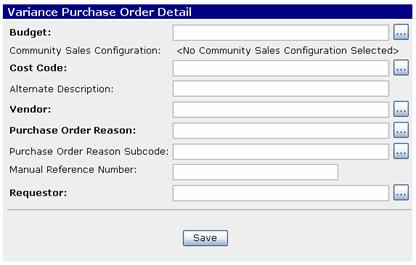
Step 1 |
Click the gray pick list button and add the Cost Code.
|
|
Step 2 |
Enter an alternative description if the standard cost code description is not appropriate for the item being purchased. (Optional) |
|
Step 3 |
Click the gray link button and add the vendor. |
|
Step 4 |
Click the gray link button and add the Purchase Order Reason. A Subcode can also be entered.
|
|
Step 5 |
The Purchase Order number will be created by the system. However, if there is another reference number from the field and/or vendor that is needed on the Purchase Order, enter that information in the Manual Reference Number field (Optional). |
|
Step 6 |
Click the gray link button and add the Requestor name. Note: This list of names is created in the Support Table for personnel.
|
|
Step 7 |
Click Save. |
Click VPOs on the navigation string select the purchase order record from the browser view.
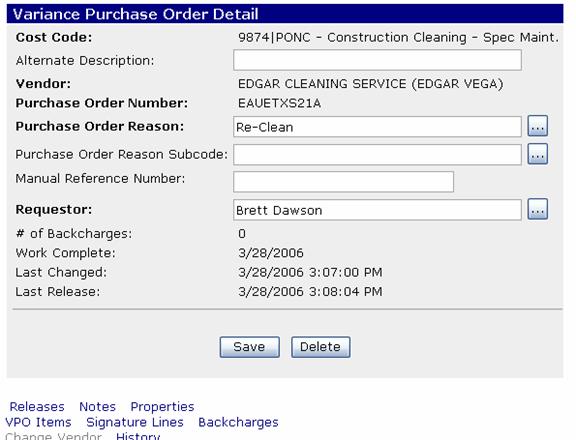
Additional information is displayed on the Purchase Order Detail screen.
The # of Backcharges count is created automatically when backcharge information is added to the VPO and this will be discussed in a separate section.
The Last Changed and Last Release are also populated automatically based on changes and releases of the VPO.
The Work Complete Date can be entered when all approvals and backcharges have been completed. No changes or backcharges can be made after the Work Complete Date iss entered. When the Work Complete Date is entered and the Save button is clicked, the following message will be displayed.

Items are sometimes needed for a VPO that do not exist in the Master Item List. To create a VPO with this type of items, complete the following steps:
1. Select the Create VPO Items link.
2. Click Add VPO Items.

3. Enter the VPO Item Detail information by following the steps below.
|
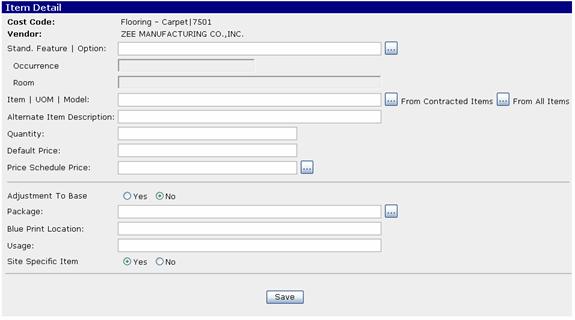
Step 1 |
Click the gray pick list button and select the Standard Feature or Option if needed.
Hint: A selection only needs to be made here if you want the variance amount to link back to an optional cost.
|
|
Step 2 |
Click the gray pick list button and select the item if it exists in the Master Item List (from All Items) or the vendor contract (from Contracted Items).
In this case, choose the appropriate contract price for the VPO, and the price will automatically be added in the Price Schedule Price field.
If the item does not exist in the Master Item List, add a text description in the Alternative Item Description field. This description will be printed on the VPO but will not be added to the Master Item List. If the item is one that will be used multiple times, add it to the Master Item List. |
|
Step 3 |
Enter Quantity. (Enter 1 if a default price is being used.) |
|
Step 4 |
Enter the Default Price (Optional) for those items without vendor pricing or when the price for the VPO item is different than the vendor’s standard bid price for the item. Hint: If the pricing for the item on VPO is different than the standard pricing for the item, a default price can be used for the total amount of the item. Quantity is informational only when default pricing is used. Quantity is not be used as a factor for calculating total pricing. Example: Quantity = 100, Default Price = $5, the total dollar amount for the item will be $5. If the unit price is $5, the default price should be $500. Note: No taxes will be calculated on a default price even if the item is marked taxable. Taxes must be included in the default price. |
|
Step 5 |
Click the gray pick list button for Price Schedule Price if the vendor pricing that was added in Step 4 was from the wrong contract and needs to be changed. |
|
Step 6 |
Click the gray pick list button for Instance and select the option instance that applies. (Required only if an option is chosen in Step 8.). List limited to instances already in the budget for the selected choice. |
|
Step 7 |
Click Yes if the item is an adjustment to the base house takeoff or No if it is not. Default is No. |
|
Step 8 |
Click the gray pick list button for Package and select a package. (Optional) |
|
Step 9 |
Click the gray pick list button for Room and select a room. (Optional) List limited to rooms already in the budget for the selected choice. |
|
Step 10 |
Enter Blueprint Location. (Optional) |
|
Step 11 |
Enter Usage. (Optional) |
|
Step 12 |
Click Save. |
The VPO follows the same submission and approval steps as the Standard Purchase Order.
Notes can be added to the VPO for informational purposes. See Lesson 3 for complete instructions on adding notes.
Instructions for adding properties can be found in this lesion under to topic Adding Properties to Budgets.
Divisions can pre-determine which VPO roles are required to sign each VPO type. These will appear as signature lines on the bottom of the VPO. See the Support Table section of the EV2 manual to learn how to set the signatures for VPOs. By choosing the Signature Lines link at the bottom of VPO detail screen, the following read only browser view will display allowing users to view the required approvals.
