
1. Choose Variance POs from the Budget Detail screen or from the EV2 Main Menu.
2. Choose Add Purchase Order from the link at the bottom of the screen.
To build a VPO from the Job Budget:
1. Choose Variance POs from the link at the bottom of the screen Budget Detail screen.
2. Click on the Add VPO link.

3. Enter the Variance Purchase Order Detail information by following the steps below.
|
Note |
|
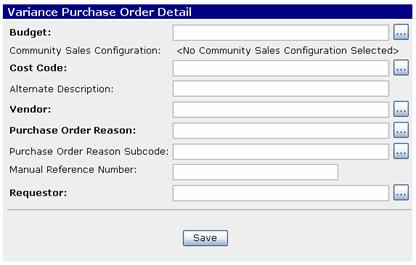
Budget is only available for selection from the Main Menu link. |
|
Step 1 |
Click the gray pick list button and add the Cost Code.
|
|
Step 2 |
Enter an alternative description if the standard cost code description is not appropriate for the item being purchased. (Optional) |
|
Step 3 |
Click the gray link button and add the vendor. |
|
Step 4 |
Click the gray link button and add the Purchase Order Reason. A Subcode can also be entered.
|
|
Step 5 |
The Purchase Order number will be created by the system. However, if there is another reference number from the field and/or vendor that is needed on the Purchase Order, enter that information in the Manual Reference Number field (Optional). |
|
Step 6 |
Click the gray link button and add the Requestor name. Note: This list of names is created in the Support Table for personnel.
|
|
Step 7 |
Click Save. |
Click VPOs on the navigation string select the purchase order record from the browser view.
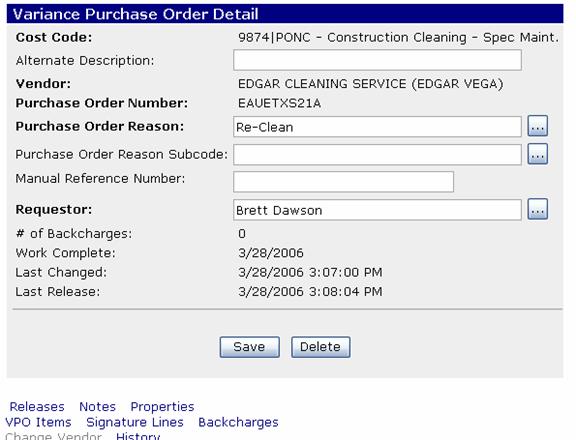
Additional information is displayed on the Purchase Order Detail screen.
The # of Backcharges count is created automatically when backcharge information is added to the VPO and this will be discussed in a separate section.
The Last Changed and Last Release are also populated automatically based on changes and releases of the VPO.
The Work Complete Date can be entered when all approvals and backcharges have been completed. No changes or backcharges can be made after the Work Complete Date iss entered. When the Work Complete Date is entered and the Save button is clicked, the following message will be displayed.
